 |
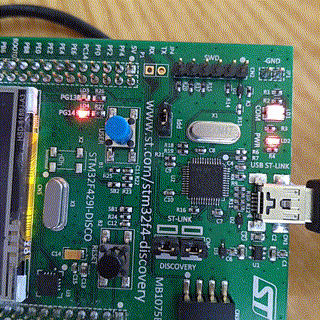
| It's alive! |
For as much as it is reasonable, I prefer to use free tools in my development work. That includes compilers, IDEs and even OS. So the software setup will be geared towards Linux, but with minimal changes should be working also under windos/mac.
First thing we need is a compiler. I will use GNU Arm Embedded Toolchain. Setup is pretty simple - unpack it and leave it be. I'll unpack it into "tools" directory in user home (~/tools). At the time of writing this, latest version is 7-2017-q4-major, so final location of toolchain is "~/tools/gcc-arm-none-eabi-7-2017-q4-major". You can test it by calling arm-none-eabi-gcc with version parameter and it should print version info:
~/tools/gcc-arm-none-eabi-7-2017-q4-major/bin$ ./arm-none-eabi-gcc --version
arm-none-eabi-gcc (GNU Tools for Arm Embedded Processors 7-2017-q4-major) 7.2.1 20170904 (release) [ARM/embedded-7-branch revision 255204]
Copyright (C) 2017 Free Software Foundation, Inc.
This is free software; see the source for copying conditions.  There is NO
warranty; not even for MERCHANTABILITY or FITNESS FOR A PARTICULAR PURPOSE
Next thing we need is ST-LINK/V2 utility for flashing the MCU via ST-Link present on all the Discovery boards (I think Nucleo has them as well). Binaries are available for Windows and some Linux distros, but other distro (Debian in my case) users will have to compile their own from the sources. Info on how to get ST-Link up and running is in ReadMe.md of their project on GitHub. Note, that you'll also need to grant access permissions to the actual USB device via udev as well. Once you have everything installed, you can try to connect your Discovery board and running st-util, which starts a local GDB (GNU DeBugger) and outputs device info:
~/tools/gcc-arm-none-eabi-7-2017-q4-major/bin$ st-util
st-util 1.4.0-36-g0af68c0
2018-05-16T12:26:49 INFO common.c: Loading device parameters....
2018-05-16T12:26:49 INFO common.c: Device connected is: F42x and F43x device, id 0x10036419
2018-05-16T12:26:49 INFO common.c: SRAM size: 0x40000 bytes (256 KiB), Flash: 0x200000 bytes (2048 KiB) in pages of 16384 bytes
2018-05-16T12:26:49 INFO gdb-server.c: Chip ID is 00000419, Core ID is  2ba01477.
2018-05-16T12:26:49 INFO gdb-server.c: Listening at *:4242...
And last, but not least, we need some actual code to compile and flash. Setting up all the clocks and peripherals on STM32 is notoriously laborious endeavor and we need drivers anyway, so why not use STM32CubeMX (what a mouthful!) for generating boilerplate? You can get it from their website (requires registration). Since it's a Java program, you obviously need some sort of Java runtime environment (JRE), but at least it's cross-platform.
We will start by generating a project for STM32F429I-Discovery board.
Let us set up project outputs and other settings first. In "Project" menu select Preferences. In preferences window Project tab define project location. For me it'll be "~/projects". Don't create separate directory for given project, for STM32CubeMX creates a separate project directory based on the project name. I'll name this project "HAL-freeRtos-test1" and refer to the folder path as a $project. "Toolchain/IDE" should be set to Makefile, rest can be left as-is, we will change those in code as needed.
In "Code Generator" tab tell the program to copy all the used libraries into project folder, generate peripheral initialization as a pair of .c/.h files, keep user changes and delete while re-generating. OK all of it, so the settings get saved.
In main window Pinout tab disable everything but FREERTOS, CRC, DMA2D, RCC, SYS, TIM1, SPI5, USART1, USB_OTH_HS. For USART1 set it to Asynchronous mode without hardware flow control.
Switch to Clock configuration tab, let it fix clocks for you (it offered to do so for me).
If all is well, you can generate code by pressing CTRL+SHIFT+G or selecting Project/Generate Code. This should create output code in the project folder you defined previously.
Next we will edit the Makefile, which is kind of a recipe for compiler what to do and how to build the executable.
The problem with STM32CubeMX code generator, is that it's somewhat buggy. At least Makefile is unusable in the state generator outputs it. First, it's missing compiler path definition. Under #binaries section you'll have to define root path for gcc binary folder. If you installed in user home/tools folder as I did, then it should look like:
#######################################
# binaries
#######################################
BINPATH = ~/tools/gcc-arm-none-eabi-7-2017-q4-major/bin/
PREFIX = arm-none-eabi-
CC = $(BINPATH)/$(PREFIX)gcc
AS = $(BINPATH)/$(PREFIX)gcc -x assembler-with-cpp
CP = $(BINPATH)/$(PREFIX)objcopy
AR = $(BINPATH)/$(PREFIX)ar
SZ = $(BINPATH)/$(PREFIX)size
HEX = $(CP) -O ihex
BIN = $(CP) -O binary -S
Now you can try to build the code as-is, but most likely it will have build errors. There are a couple of issues in the generated code.
First issue is definition of "__weak" attribute, which compiler does not like. It often is used to define some sort of default implementation of an interface function, which is required by libraries. Most of these implementations are empty and are meant to be overridden by the application code somewhere else. Anyhow, we have to fix it first. Correct way of doing it, is using "__attribute__((weak))" instead. So we will have to fix it manually. In file $project/Src/freertos.c replace hook definitions with correct ones:
..
__attribute__((weak)) void vApplicationIdleHook( void ) {
..
__attribute__((weak)) void vApplicationStackOverflowHook(xTaskHandle xTask, signed char *pcTaskName) {
..
__attribute__((weak)) void vApplicationMallocFailedHook(void) {
..
If you are lucky, it might compile now. Compilation is done by running make program in the directory with Makefile in it:
$ cd ~/projects/HAL-freeRTOS-test1
$ make
It is quite likely, that it still won't compile and will complain about main() or other functions already been defined in main.c or other files. This is an indicator of duplicate source file definitions in the Makefile. Open Makefile in your favorite text editor and under C_SOURCES definition remove all the duplicate entries (at least those, which start with Src path). Do not comment out entry, for it breaks the script, just delete the whole line.
While you are there, you can also remove all the lines that point to files, not directories in SOURCES_DIR definition.
Please note, that all of the lines in SOURCES_DIR and C_SOURCES definitions have to end with backslash ("\"), except the last one. Backslashes indicate that the command continues on the next line, lack of it indicates, that the command ends there.
Now it should compile. You could flash it as well, but it doesn't do much yet. Let's add our blinker functionality to the mix.
In Src/freertos.c there is a StartDefaultTask function defined. As of now it does not do anything. We can add our code there. All we have to do, is replace contents of infinite for loop with what we want it to do:
void StartDefaultTask(void const * argument) {
  for(;;) {
    osDelay(500);
    HAL_GPIO_TogglePin(GPIOG, GPIO_PIN_14);
  }
}
Now we can build the program and flash it to our dev board and we should see red LED blinking every half a second:
$ cd ~/projects/HAL-freeRTOS-test1
$ make
$ st-flash write build/HAL-freeRTOS-test1.bin 0x8000000
Let us go through the program code, as it flows:
- We start in main() in main.c. Generated code
- initializes HAL
- sets up all the clocks
- initializes GPIO
- initializes CRC
- initializes TIM1
- initializes USB functionality
- initializes USART1
- main() then calls MX_FREERTOS_Init() from freertos.c. There it has just one simple task definition (StartDefaultTask()), which gets assigned to a new thread
- main() starts the task scheduler by calling osKernelStart(), which controls execution of all the tasks defined in MX_FREERTOS_Init() function
- StartDefaultTask() gets executed and then suspended for 500 ms, when it gets executed again
- Point 4 ad-infinitum
Next entry in series is:
STM32 + HAL + FreeRTOS Part II: UART
Edit: compiling and flashing on Windows (tested on 10)
On Windows you can use either MinGW shell port or Linux Subsystem on Windows or just a GNUWin32 to provide make tool. Then you need Git for Windows for checking out sources. Latter is optional, if you do it from scratch.
I went with the standalone make tool, since it integrates reasonably well with the OS and is relatively minimalistic. After installing it, you'll need to add binary folder (e.g. C:\Program Files (x86)\GnuWin32\bin) to the PATH for convenience.
Please note, that ARM Embedded toolchain installer by default wants to install in folder with a space in it. GNU make deals poorly with spaces, so please choose paths such, that they are reasonably brief and do not contain any special characters, including spaces. e.g. "C:\tools\arm\7-2017-q4-major" is fine, while "C:\Program Files (x86)\ARM\7 2017-q4-major" is not OK. I wonder, why installer devs did that.
There is another issue with path separators (windows "\" vs POSIX "/"), but windows seems to be able to chew them both in mixed usage:
c:\projects\STM32F4-HAL-FreeRTOS>make
..
C:\tools\arm-gcc\7-2017-q4-major\bin/arm-none-eabi-size build/HAL-freeRTOS-test1.elf
   text    data     bss     dec     hex filename
  18484     120   35040   53644    d18c build/HAL-freeRTOS-test1.elf
C:\tools\arm-gcc\7-2017-q4-major\bin/arm-none-eabi-objcopy -O ihex build/HAL-freeRTOS-test1.elf build/HAL-freeRTOS-test1.hex
C:\tools\arm-gcc\7-2017-q4-major\bin/arm-none-eabi-objcopy -O binary -S build/HAL-freeRTOS-test1.elf build/HAL-freeRTOS-test1.bin
For flashing you still need ST-LINK utility, which you can download from STM website (requires email/registration). It's an installer, so it should be pretty straight forward.
Once installed (both tool and the driver), start the tool, connect your devboard and press the plug button to connect to it. Once connected you should see memory contents. Then you can open file, select the compiled .bin file from build directory and perform the flashing (Program verify option in ST-Link utility).
I updated the Makefile to include windows GCC path separately from Linux, so you can have multiple setups as I do (windows machine for playing computer games, windows machine at work and a Linux laptop for off-site coding sprees):
#######################################
# binaries
#######################################
ifeq ($(OS),Windows_NT)
BINPATH = C:\tools\arm-gcc\7-2017-q4-major\bin
else
BINPATH = ~/tools/gcc-arm-none-eabi-7-2017-q4-major/bin/
endif
No comments:
Post a Comment